In general I don’t want to give investment advices because everyone is different (wealth, objectives, pain tolerance, etc). However, some advices are so safe and sound that I feel it is worthwhile to share, better than watching people around me falling into some simple traps (impulse or intuition trading, coffee shop stock whispering, headline chasing, etc).
If You Are “Young”
“Young” means you are 5 years away from retirement. You are generally in the asset growth mode. Divide your investment into 3 buckets, and assign certain weight (percentages) to each bucket. If you are not sure, just assign 33.3% each.
- Broad market ETF: VOO (Vanguard S&P 500), VTI (Vanguard total market index)
- Growth ETF: QQQM (Nasdaq 100), VUG (Vanguard growth)
- Value/dividend ETF: SCHD (Charles-Schwab Dividend), VYM (Vanguard high dividend), DGRO (iShares Core Dividend)
Feel free to pick’n’choose, and even add more of your favorites to each bucket list, but the key is to stick with the bucket-based asset allocation strategy and the pre-defined percentages.
On-going maintenance is easy:
- Re-balance the portfolio to the preset percentages once a year or twice a year.
- If you need money, sell from the bucket that exceeds the preset limit.
- If you have money to invest, buy into the bucket that is under the preset limit.
If you do this consistently for over 10 years, something amazing happens:
- You have very few things to do, no research, not many trading. Very suitable for lazy people.
- Your portfolio will almost certainly perform better than general market (e.g., against VOO or VTI), which also means it performs better than 85% of all mutual funds.
- As a result, you sleep better in the night and you smile better.
If you want to dig deeper, see this video for some insight on the so-called 3-fund portfolio (or 3-bucket strategy in my case). It also have suggestions on assigning the percentages for each bucket.
If You Are “Old”
“Old” means you are retiring in 2 years or have already retired. In this case a 4th bucket becomes very important, the income generation ETF.
Why? Income ETF does not give you better total return over the time. But it gives better night sleeps by avoiding the really bad years, while also losing some spectacular years at the same time. For retirees, that is a good trade-off.
I recommend you allocate this bucket large enough to cover your 50% to 80% of your living expenses. The remaining money can follow some variations of the above 3-bucket strategy.
I have researched and rated some income generation ETF funds. The ones I like right now include:
- JEPI, JEPQ, GPIX, GPIQ, SPYI, QQQI, XYLD, O, SPYD
In general you should be able to generate ~8% income while preserving or slightly growing underlying capital.
If you want to dig deeper, the following youtubers have influenced me or share some similar ideas or offer more insights in this topic:
Some Misc Notes
- Don’t fall into Roth IRA conversion trap. It is usually worse than it sounds.
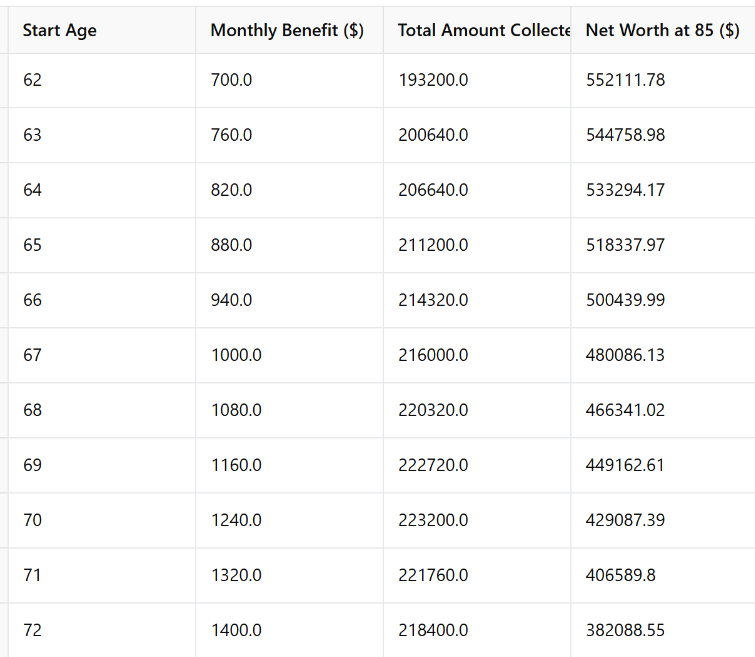
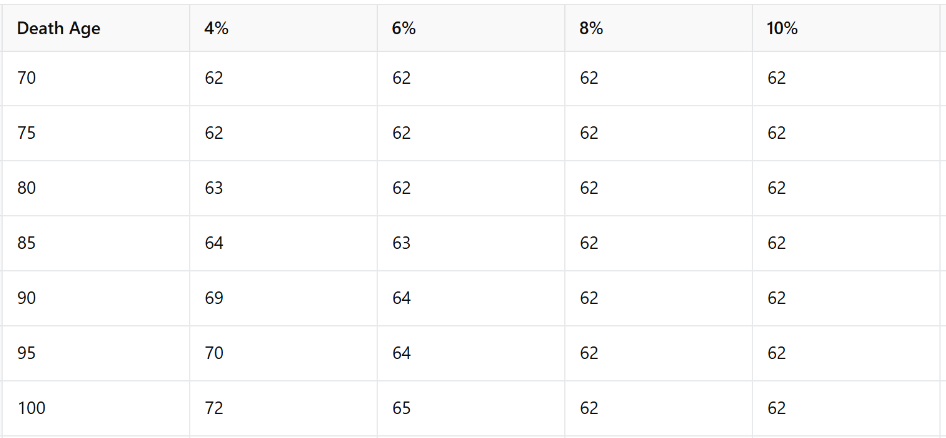
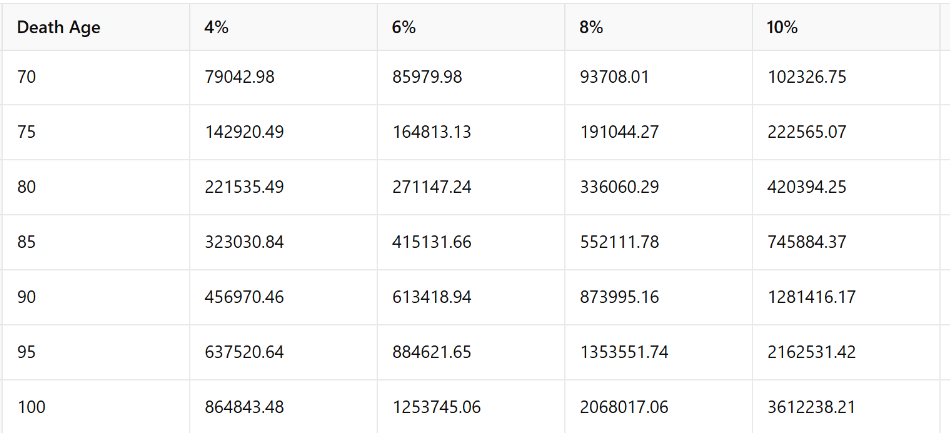
- Also don’t believe that it is always better to delay your social security benefits. I did an analysis, which shows maybe you should claim your benefits as early as 62.