
Background
It’s pretty stupid and annoying (maybe intentional?) that AWS provides DNS service (Route 53) but does not provide dynamic DNS to its own instances!!! This blog describes a method to achieve just that with various AWS features, namely EC2 instance events, Lambda functions and Route 53.
Specifically,
- You must already host some domains with Route 53
- You like to launch EC2 instances with public IP addresses
- You like to assign some cool domain names to those EC2 instances, automatically
- When those instances are stopped, you like those domain names are removed automatically
I have done this for over 5 or 6 years now. The blog is an attempt to capture what I did and keep my memory fresh! The approach was based on some early articles, most likely an early version of this one. However, I spent time to develop my own version which has diverged significantly now. For example, my version supports multiple domains and doesn’t use database. Also my blog will focus on using AWS console operations instead of using CLI.
Usage
Suppose you own a domain called mydomain.com and you are hosting it with Route 53. When you launch an EC2 instance, you can set the name tag as “ddns-fun.mydomain.com” during launch or startup time. See pictures below. After the instance starts running, you will automatically have a A-type DNS record “fun.mydomain.com” pointing to the instance’s IP address.
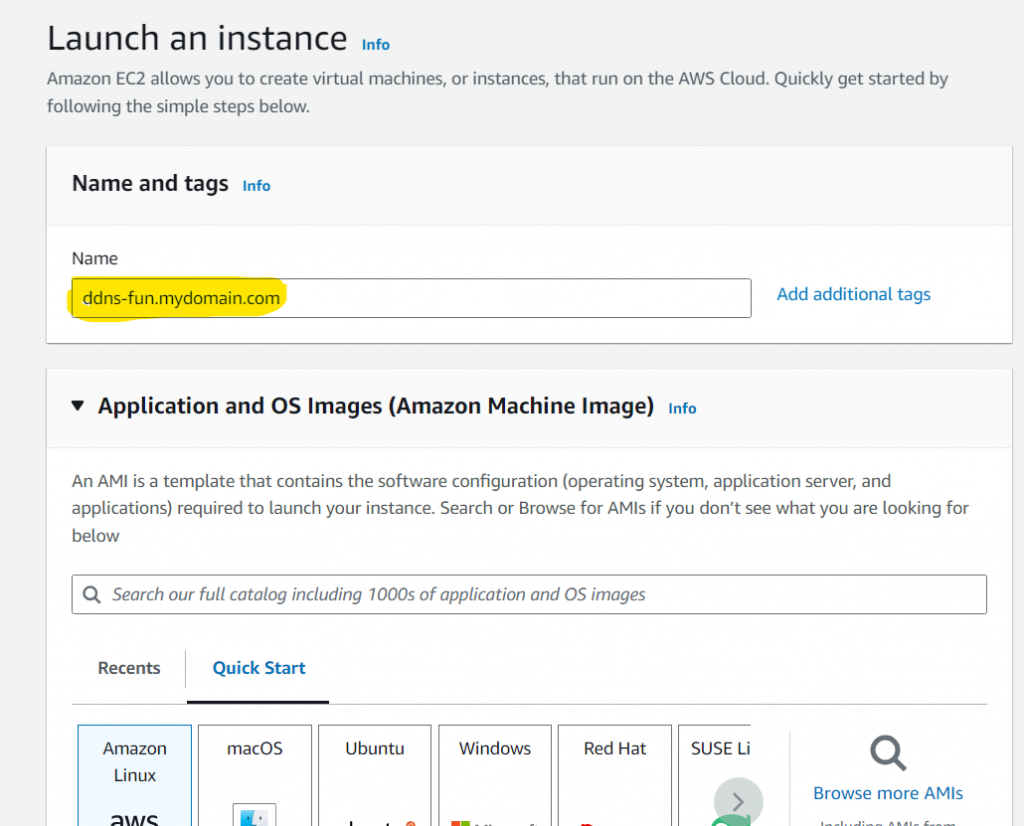
During EC2 launch 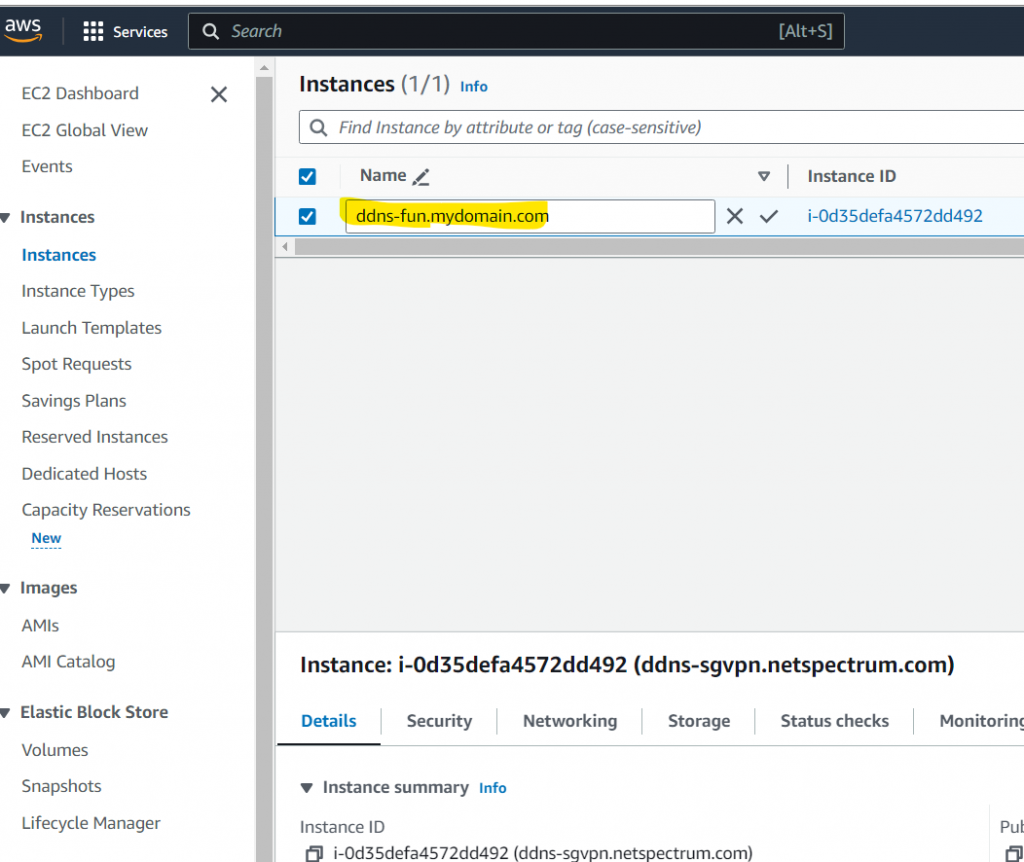
After EC2 launch
When you stop or terminate the instance, the DNS record will be removed automatically.
Overview of the process
It is relatively complicated. Below is an overview.
- The central piece is a lambda function written in Python 3.x called ddns_lambda. This function will receive events when EC2 instances are started or stopped. It will examine the name tag or DNS records to determine whether it should add some DNS records or remove them.
- In order for the ddns_lambda to run with right permissions and access the recourses, you will create an IAM policy, called ddns-lambda-policy and an IAM role, called ddns-lambda-role.
- Lastly you will create an event triggering rule that monitors EC2 instance start/stop. When such event happens, ddns_lambda function will be called.
Let us dive in!
Create a policy for DDNS lambda role
- Go to AWS/Services/IAM/Policies
- Click on “Create policy” on the top-right
- On “Specify permissions” page, choose JSON option and enters following code. The policy allows access to ec2 instance query, write logs, and full access to route53.
{
    "Version": "2012-10-17",
    "Statement": [
        {
            "Effect": "Allow",
            "Action": "ec2:Describe*",
            "Resource": "*"
        },
        {
            "Effect": "Allow",
            "Action": [
                "logs:CreateLogGroup",
                "logs:CreateLogStream",
                "logs:PutLogEvents"
            ],
            "Resource": "*"
        },
        {
            "Effect": "Allow",
            "Action": [
                "route53:*"
            ],
            "Resource": [
                "*"
            ]
        }
    ]
}- Name the policy as “ddns-lambda-policy”
- Click on “Create policy”. Done!
Create a role for DDNS lambda function
- Go to AWS/Services/IAM/Roles
- Click on “Create role” button on the top-right
- Select “AWS services” (default) and pick “Lambda” as the target service
- Next page, search and select “ddns-lambda-policy”
- Next page, name role as “ddns-lambda-role”
- Click on “Create role”. Done!
Create EC2 instance event trigger
- Go to AWS/Services/Amanzon EventBridge/Rules
- Click on “Create rule”
- Name it as “ec2_lambda_ddns_rule”. Click on “Next”
- Leaving most as default and scroll down to “Event pattern” section
- “AWS service” – select “EC2”
- “Event type” – select “EC2 Instance State-change Notification”
- “Event Type Specification 1” – select “Specific state(s)”
- Select “Running”, “terminated”, “stopped” 3 states
- At this point, you should have event pattern shown as following. Then Click “Next”
{
  "source": ["aws.ec2"],
  "detail-type": ["EC2 Instance State-change Notification"],
  "detail": {
    "state": ["running", "terminated", "stopped"]
  }
}- For “Target 1”, select “AWS service”, “Lambda function”, “ddns_lambda”
- Then just click “Next”, “Next”, “Create rule”. Done!
Create and test DDNS lambda function
Create function template
- Go to AWS/Services/Lambda/Functions
- Click on “Create function” on the top-right
- Choose “Author from scratch”
- Function name – enter “ddns_lambda” for example
- Runtime – Choose any python3.x
- Architecture – Choose “arm64” architecture for tiny bit of money savings
- Execution role – choose “Use an existing role” and select “ddns-lambda-role”
- Click on “Create function” at the bottom.
Upload the code
- First, download the code and save this zip file
- Go to AWS/Lambda/Functions/ddns_lambda, the function template you just created.
- Click and select “Upload from”/”.zip file” menu item to import the code into source code console
- IMPORTANT!!! Update zone_names variable with your own domain names. It supports multiple domain names as an array.
- Scroll down. Update “Runtime settings”/”handler” to be “union-py3.lambda_handler”
Configure the function
- Go to AWS/Lambda/Functions/ddns_lambda
- Click on “Configuration” tab in “Code source” panel
- Click on “General configuration”, change timeout to 100 seconds.
- Clock on “Triggers”
- Click on “add triggers”
- Select “EventBridge (CouldWatch Events)”
- Choose “Existing rules” and select “ec2_lambda_ddns_rule” created above
- Click “Add”
Deploy and testing
- Go to AWS/Lambda/Functions/ddns_lambda
- in “Code source” panel, click on “Deploy” button. Done!
Now you can start to launch an instance, stop it or terminate and see if corresponding DNS records are added or removed. A few tips about debugging:
- Watch lambda function logs
- Go to AWS/Lambda/Functions/ddns_lambda
- Click on “Monitor” tab
- Click on “View CloudWatch logs”
- I usually do “Live Tail” monitoring
That is it! Let me know what you think.