
Background
My goal is to install fully updateable Ubuntu 20.04 onto a USB stick, so that I can boot it up with any Intel-based PC’s or laptops. However, due to what I considered a bug in Ubuntu, this is actually harder than it should be. So I wrote down this blog in the hope it might help others, as well as my future self, in the similar shoes.
Note that the objective is different from so-called LiveUSB ubuntu with persistency, where Ubuntu OS itself will remain as a static ISO image and updates are added on-top in a separate persistent partition. My goal is to install a standard Ubuntu OS on a USB disk, which can be updated and upgraded just like normal PC case, except that a) it is on a portable USB drive or disk and b) it is portable across different PC’s. I suppose this setup gives longer life span of the installation, which potentially allows you to even upgrade your OS later.
In the following steps, I will also show an optional feature which creates an encrypted home directory.
Assumptions and Prerequisites
- You need Intel x86_64 PC
- We assume it support UEFI and GPT partitions which are standards for all recent ones
- A USB drive that holds Ubuntu ISO image for installation, a.k.a. the installation media drive. This needs to have 4GB minimum size.
- A second USB drive or disk that will hold installed Ubuntu OS, a.k.a. the installation target drive. This one needs 16GB minimum size
Step 1 – flash Ubuntu ISO image to the installation media drive
I will not repeat the process here. Please refer to many pages below.
- https://ubuntu.com/tutorials/create-a-usb-stick-on-ubuntu#1-overview
- https://ubuntu.com/tutorials/create-a-usb-stick-on-windows#1-overview
- https://ubuntu.com/tutorials/create-a-usb-stick-on-macos#1-overview
Step 2 – Prepare the partition table on the target drive
- Insert installation media drive into PC.
- Interrupt normal booting sequence and choose the media USB drive as the boot device
- Different PC have different process to do this. On Lenovo PC, one has to press ENTER on bootup, and then press F12 to select boot device
- Select “Try Ubuntu” when presented the option
- Insert target USB drive
- Identify which drive is target USB drive by examining the output “lsblk”
- In most case if you follow the instructions exactly, it would be “/dev/sdb”
- Once Ubuntu is up and running, start a terminal and type “sudo gparted /dev/sdb” (replace “/dev/sdb” with the right usb device you have for the target USB drive)
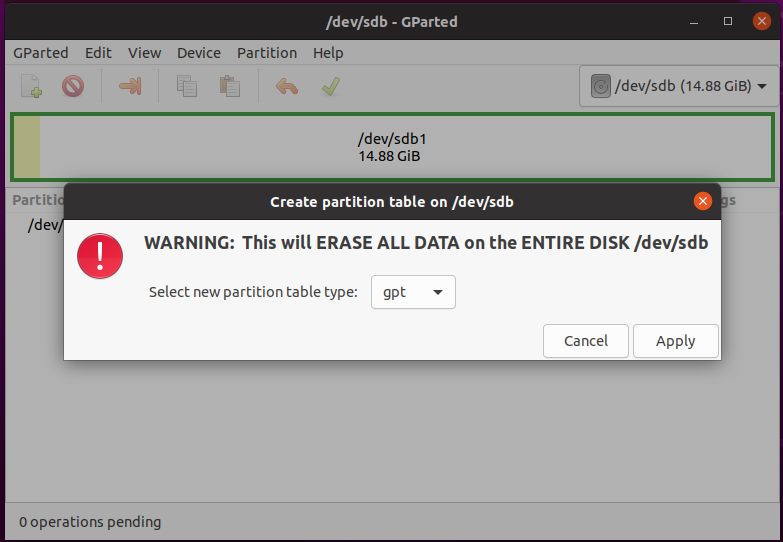
- create GPT partition table
- click “Device”/”Create Partition Table …”
- select “gpt” as partition table type
- See Pic #1 below
- create 100MB fat32 partition as ESP partition
- Click “Partition”/”New”;
- Enter “100MB” as size and select “FAT32” as file type
- See Pic #2 below
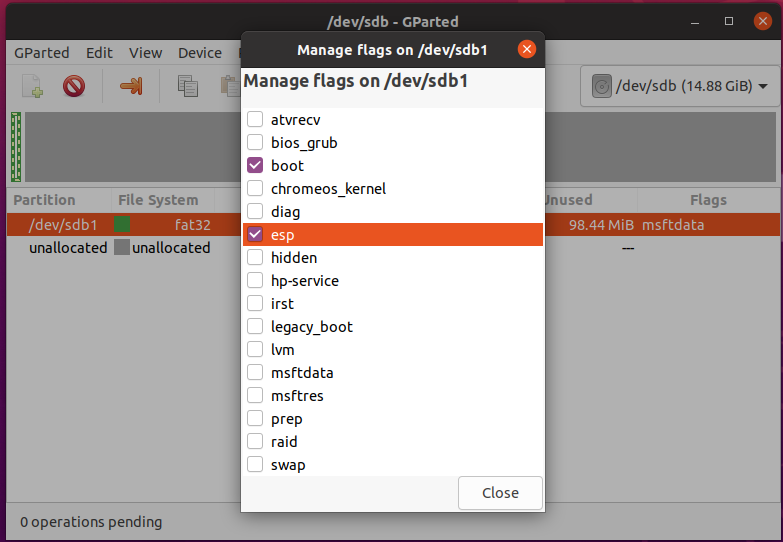
- set “esp”, “boot” attributes to the new ESP partition
- Apply changes to actually crate the partition
- Select the ESP partition and then select “Partition”/”Manage Flags”
- In the pop-up window, select “esp” and “boot” flag
- See pic #3 below
- create an ext4 partition that takes the rest of space for root partition
- See pic #4 below
- (optional) if you like to have encrypted home partition, create an ext4 root partition with size of 10GB or more, and leave the rest free space open for encrypted home petition later.
- Pic #5 shows the partition table at this step.
- create GPT partition table
Pic #1 – Create GPT Partition Table 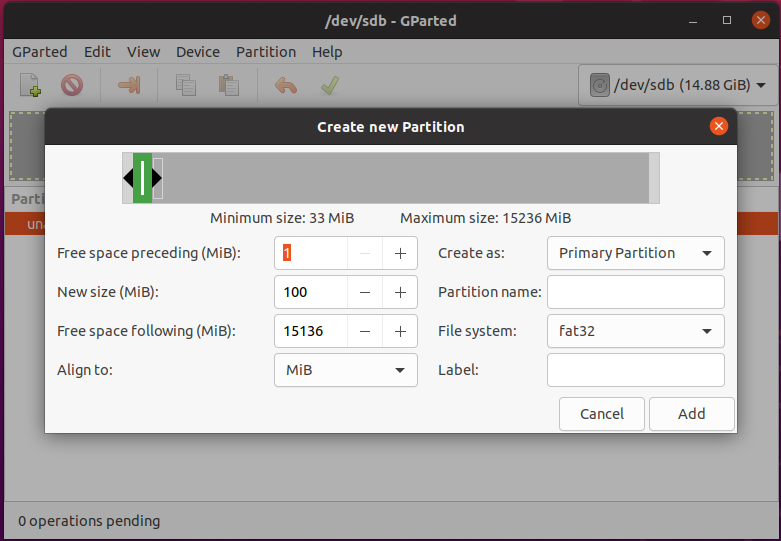
Pic #2 – Create ESP Partition
Pic #3 – set esp/boot attributes 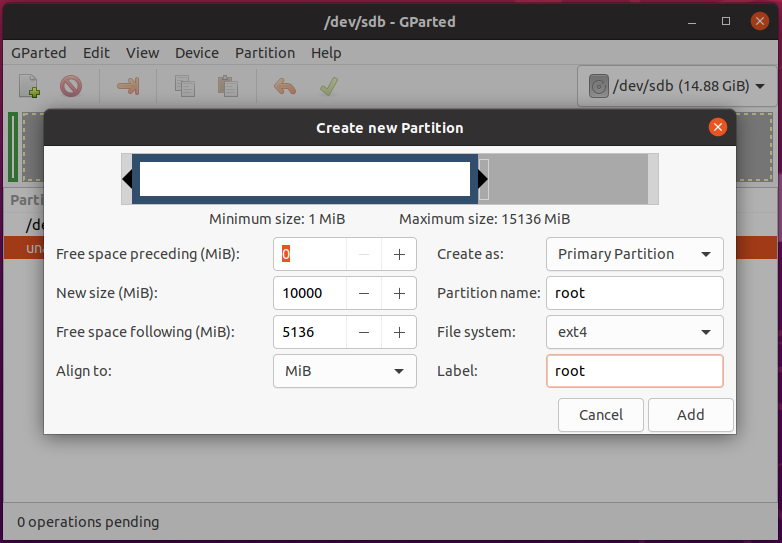
Pic #4 – create root partition

Step 3 – Install Ubuntu
Once we finish the above step, quit gparted and we are ready to install Ubuntu into the target USB drive.
- click “install ubuntu” icon on the desk to to start installation
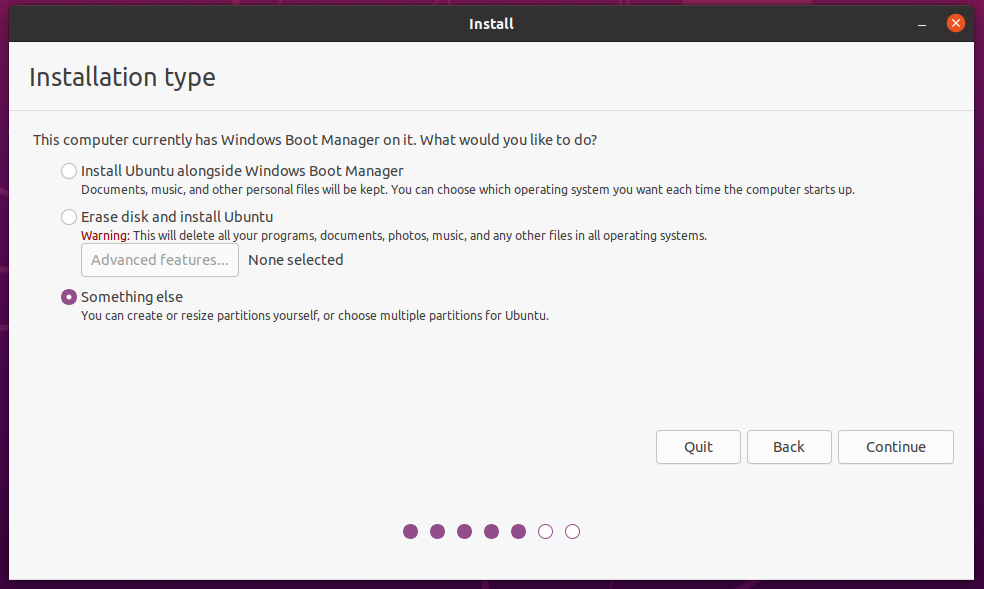
- select “something else” in partition page. See Pic #6 below.
- select the ESP partition on the target USB drive as the “ESP” partition. See Pic #7 below.
- select root partition and mount as “/”. See Pic #8 below.
- (optional) Create encrypted physical volume
- Select the free space left during creating partitions
- Click “+” to create a new partition/volume
- select “encrypted physical partition”.
- See Pic #9 below.
- wait for a while, select “/dev/mapper/sdb3_crypt” as “/home”. See Pic #10 below
- Finish installation.
Pic #6 – Select “Other” installation type 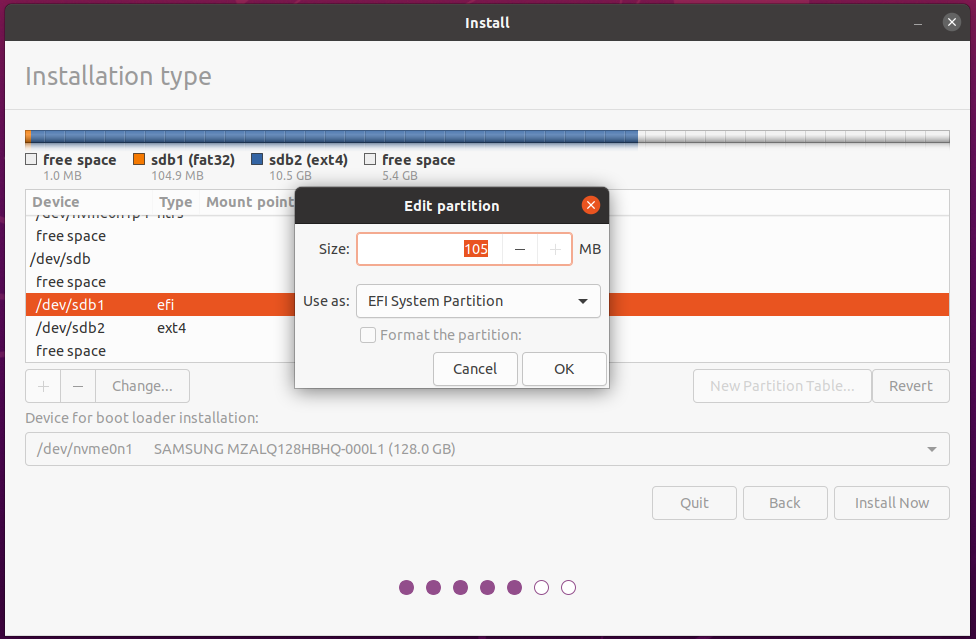
Pic #7 – Set ESP partition
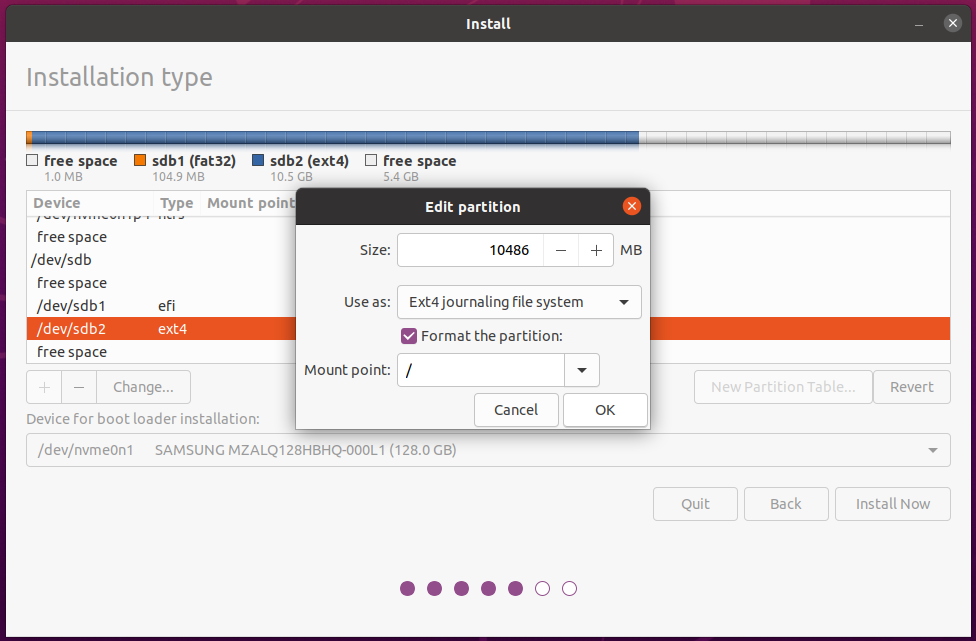
Pic #8 – set root partition 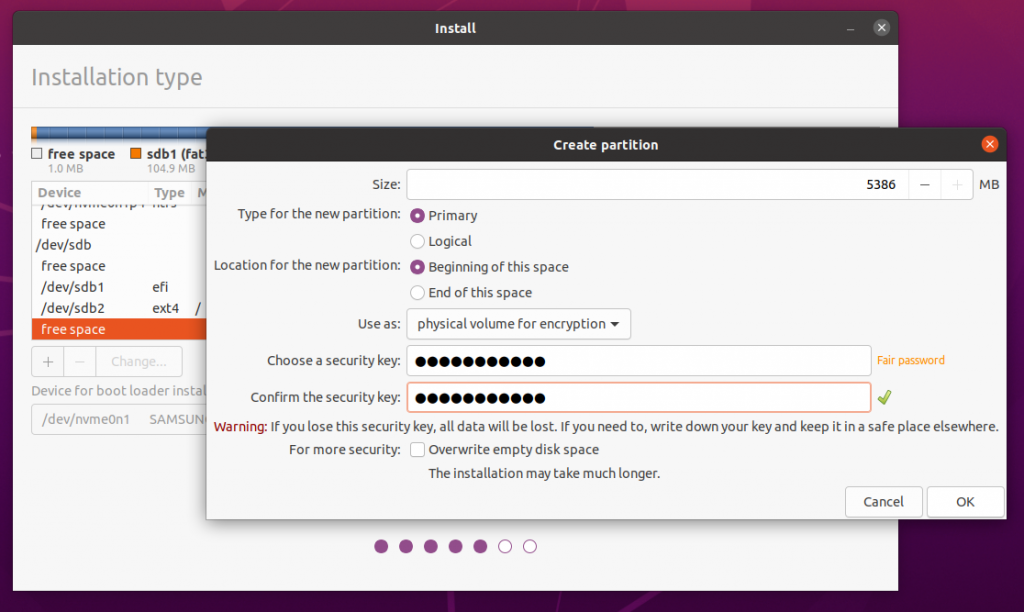
Pic #9 – create encrypted physical volume
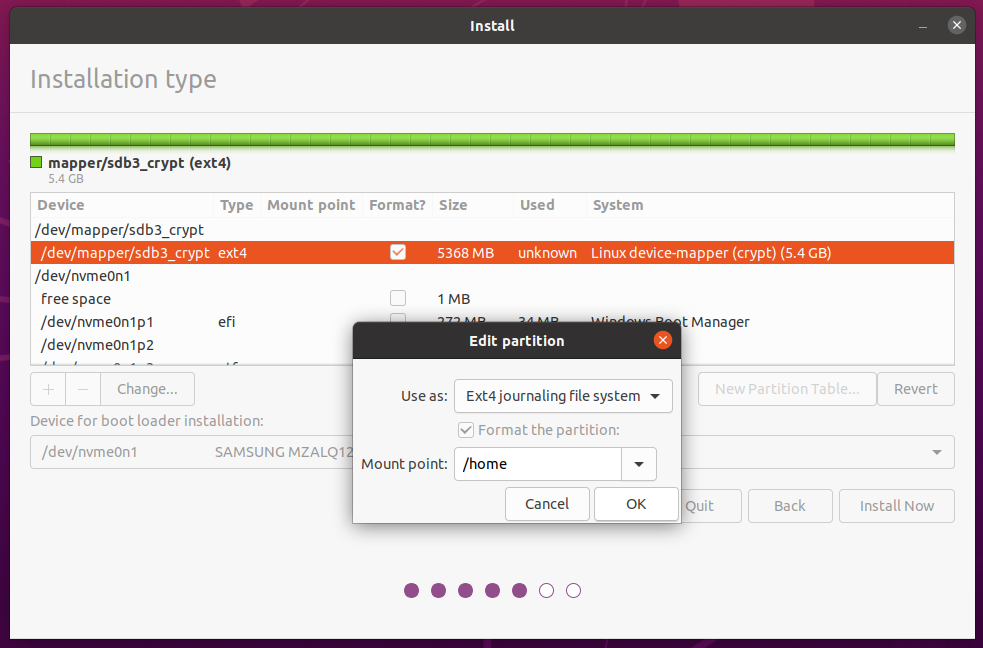
Pic #10 – Create/set home partition
Step 4 – Fix EFI on target USB drive
At this point you might get an illusion everything is working, because if you reboot the PC you will be able to select either Ubuntu or Windows to boot up, and they all work. However, there are 2 very serious problems
- If you boot into BIOS and select the USB disk as boot device, it won’t work.
- Even worse, your PC is likely not able to boot up Windows either if you remove the target USB disk.
The reason for these problems is that, despite we told Ubuntu installer to install Ubuntu on the USB disk, which implies it should use the ESP partition on target USB disk, it still uses the ESP partition on PC built-in disk, and thus screws up EFI partition on PC and leave an empty EFI on target USB disk. See more details at this very old bug report.
So the first thing we need to do is to install Ubuntu loader into USB ESP partition and install grub into USB disk
- Reboot into BIOS firmware and select “ubuntu” as the boot target
- switch EFI mount
- Type “lsblk” to verify that ESP partition on PC built-in drive is mounted
- umount it, “sudo umount /boot/efi”
- mount the right one, ” sudo mount /dev/sda1 /boot/efi”
- install grub boot on USB EFI partition
- “sudo modprobe efivars”
- “grub-install -d /usr/lib/grub/x86_64-efi –efi-directory=/boot/efi/ –removable /dev/sda”
- Note “–removable” flag is important in the above command as it allows USB to boot on any Intel-based PCs
- Reboot into BIOS firmware and select target USB as boot device. It should work now.
- You can try the USB disk on other PCs, and it should work as well.
At this point, /etc/fstab is probably mounting PC EFI partition to /boot/efi, which is wrong and will break when you boot the target USB from another PC. You can either delete the /boot/efi line in /etc/fstab, or replace the UUID with the one for EFI partition on target USB. You can find out the UUID with “blkid” command (e.g., blkid /dev/sda1)
Step 5 – Restore PC boot loader
Now let us fix PC does not boot up problem (if you encounter this)
- Boot up the PC into BIOS and select the newly made Ubuntu USB drive as boot device. This will boot into Ubuntu.
- Open a terminal
- Remove Ubuntu from PC EFI partition, and PC will boot up windows again
- Mount host EFI partition as /mnt, “sudo mount /dev/nvme01n1p1 /mnt”
- “cd /mnt/EFI/”
- “sudo rm -rf ubuntu”
- NOTE 1: If your PC is already installed with another Ubuntu system, the bootloader entry “ubuntu” will collide with each other and the previous Ubuntu will not be able to boot. You can follow this guide to restore booting the previous Ubuntu system.
- NOTE 2: Annoyingly, if your PC is already installed with another Ubuntu system, each time you boot up with the USB target disk Ubuntu, it will modify the bootloader entry and cause previously installed Ubuntu unable to boot. It is possible to rename previous Ubuntu bootloader in some tricky way so that both can live peacefully. That probably warrant another blog.